Monday, 21 October 2013

My Quilt's Featured on Quilt Story!

I can't tell you how excited I am to be able to say that!

I've shared the story behind my I Love NY quilt...


 http://quiltstory.blogspot.com/2013/10/i-love-ny-quilt-from-quilt-candy.html

I hope you enjoy reading about it!


And I can't wait to display this badge of honour on my page:
   
Quilt Story

Thank you so much for stopping by,

Sarah x

Tuesday, 15 October 2013

Feeling Humble

The other day I wrote about the photo quilt that I made, and I included a tutorial of how I put it together.  If you missed it, here's the link to my photo quilt tutorial.

 
Since then, I've heard from the family who I made the quilt for.  And it turns out that it's now hanging up at a camp in Afghanistan, and not only that, fellow comrades are admiring it! 


I feel honoured to have made it, and so thrilled that something that I made at my kitchen table is now providing comfort and smiles to someone so far away, serving for his country. 
 
Sarah x
 
Linking up with:
 
Fresh Poppy Design 

Sunday, 13 October 2013

How to make a Photo Quilt - A Tutorial

A few months back I was asked if it would be possible to make a photo quilt/wall hanging made up of family photos.  This is not something I'd done before, but I jumped at the chance to make something different and truly unique.  It was going to be going to Afghanistan as a special keepsake so it had to be perfect.  Here it is!


So if you've never made a photo quilt before, and would like to know how, this is how I did it. 
 
1) First, the photos needed to be converted to fabric.  There are two options here.  
 
a) Purchase some fabric sheets, specially designed to go through domestic printers, and print your photos that way.
 
b) Use a specialist company to convert your photos to fabric. 

I opted to go the professional route, as I was not sure that my printer would provide high enough quality fabric photos.  I used a company called Pictures to Fabric based in the UK, who were excellent throughout all stages of the process.  After some discussion it was jointly decided to have the photos printed onto faux suede, as this had a lovely feel to it, the photos came out really clearly and it was easy to stitch with. 
 
2) In order to get the  photos to the printers, I used my Dropbox account.  There were 25 photos in total, which my customer emailed to me, and I put them into my Dropbox account.  I've you've never used Dropbox before, it's a great way of sharing a large collection of photos.  You simply invite the recipient to access the folder.  So Pictures to Fabric were able to access and print them.  I had all the photos printed on one piece of fabric, with a gap in between them.  My customer chose colour photos but you could also opt for black and white or sepia. 


3) I cut all the photos down to 5 1/2" x 5 1/2" fussy cutting them, to capture the best part of the photo.  I then stitched them all together in the normal way.


4) Next, I needed a border for my quilt, and my customer chose fabrics from Tula Pink Salt Water collection for a scrappy border.  A Good choice!


Of course you can have great fun playing with layouts and fabrics and colours here, the world is your oyster :-)
 

6) I basted the quilt using quilting pins and stitched in the ditch around all of the photographs.  You don't want any fancy quilting here, as you may obscure all your lovely photos!    I put my stitch in the ditch foot to the test for the first time, and it made the job much easier.   

7) For the scrappy border, I decided to add some hand quilted detail.  I reached for my favourite Anchor no. 8 pearle cotton thread and did a loopy design all around the edge.
 

If you look closely you can see the subtle hand quilting

But of course you could quilt this any way you like. 
8) Bind the quilt in the normal way.  For this quilt I used a coordinating Salt Water fabric. 


9) As this quilt is going to eventually going to be a wall hanging, I created a hanging sleeve to go on the back.  I watched the this tutorial on Youtube for guidance.  


Here you can see the opening. 

 
This is the back of the quilt. 


And here it is, finished!


I hope you like it and found this tutorial useful.  If you ever have a go at making one, I'd love to hear from you!

Finally I would like to say thank you to the family who asked me to make this quilt.  Firstly for trusting me to make it, and secondly for allowing me to share their family photos and the quilt on my blog.  I feel honoured to have made it for them, and very excited that it's going to be travelling to Afganistan.  What a wonderful way to feel close to your family and take them with you. 

Sarah x

Linking up with:

Handmade Harbour


stitch by stitch


Friday, 11 October 2013

When Julie Came to Jersey

I mentioned a few weeks ago that my wonderful online friend Julie was coming from Australia to meet me here in Jersey (via a week and a half trip to England). Well she came!!
 
It was to be our very first meeting in person, following two and a half years of friendship though our blogs, facebook and email. And I can honestly say Julie was even more wonderful in real life, I just love her!

 
It's a weird feeling meeting someone for the first time, and yet knowing so much about them and feeling like you know them.  But we very quickly overcame our nerves, and I think we chatted non stop for 4 days.  Poor Ian, Julie's husband, he was probably glad to get on a plane back to Oz just to get a moments peace!
 
And oh what fun we had.  I have very few pictures because I did too much talking.  We did lots of sight seeing, (for my Jersey friends, we covered most of the West of the Island) and lots of our time revolved around food - just look at our delicious lunch :-)

 
And that evening, after home made cakes made by my daughter that afternoon (damn, I forgot to take a picture) it was all round to ours for cheese and wine.  Yum!


The next day, after more chatting, relaxing and lunch, we headed into town for a lovely meal.  Oh and here you can see Mr Candy, aka Pete,  my lovely husband.  He's usually a bit shy and doesn't feature  often!


To accompany our delicious meal, Ian insisted I have some of this...


Which was delicious and warming, as you can imagine ;-)

If you were wondering whether any quilting was going to feature in this blog post, then hopefully I won't disappoint.  Here is a little mini that I made for Julie, who, back in Oz has just finished building a brand new home. 


(I had planned a separate blog post about my quilted house, but I was still stitching the last stitches just hours before Julie's arrival, so I ran out of time).
 
Julie treated me to some wonderful gifts too.  A gorgeous silver bracelet, that I will treasure forever, and no less than 3 Australian Patchwork and Quilting Magazines.  I'm still enjoying reading them now, and I shall tell you more about them soon.  I would be interested to hear your thoughts on  different P and Q magazines and how they compare to the UK ones too.   
 
So now Julie and Ian are back in Oz and I am so thrilled and delighted that we got to meet after all this time.  I know that thanks to the internet, we wll be friends forever.


Sarah x
 
Linking up with:  Crazy Mom Quilts


Wednesday, 9 October 2013

A little bit of Christmas

Hooray!  Mr Candy has fixed the laptop!  So full blogging service can resume.  Phew.  I felt like I'd lost a limb not being able to blog and email properly for nearly 2 weeks!
 
One good thing about not having easy access to a computer is, it does create more sewing time.  So I've been very busy on my machine this week, but I shall tell you about that another time. 
 
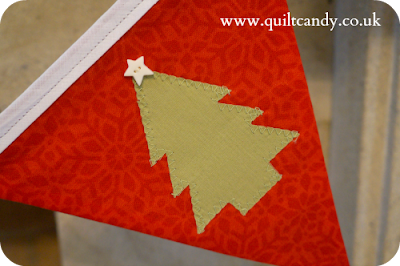
For now, I want to share with you two sets of bunting that I've made for Christmas using the 'In From the Cold' collection by Kate Spain.  I just love this range and I couldn't wait to get started.  This first set is a series of little Christmas appliques.


I hope you are appreciating the Christmas decorations by the way.  As well as re-building the laptop, I've had Mr Candy up and down the attic getting the decs out and then away again, in aid of my little photoshoot.  Hopefully it was worth it! 

Anyway, here's some close ups of the detail.  I love buttons and I hardly ever get to use them, so here was the perfect excuse.  A little star at the top of my tree.


And here's another star, on this gorgeous star fabric, that I think I am going to have to purchase by the bolt, I love it so much. 


And as my centre piece, I've put some mistletoe on the mistletoe - anyone for a kiss??!  (Offers from tall, dark, handsome men only please).


So that's the first set.  The second set is very similar and looks like this. 


The idea is that it can be personalised with whatever Christmas word you like.  Someone suggested Ho Ho Ho to me on facebook, and I loved it, so that's what I went with. 

Here it is close up. 


And I just love the snowflake white fabric for the letters too.


Isn't this fabric just so pretty?!  Sorry, I said that already. 


Well, I hope you like them.  For now they shall be going away, and coming out again on the 1st December.  We are away for Christmas so the added bonus is they will fit in the suitcase! 
 
 
Back soon with lots to tell you about, and maybe, just maybe a quilt tutorial.  Watch this space. 
 
Thank you so much for stopping by,
 
Sarah x
 
Linking up with:
 
BLOG TITLE
 

Saturday, 5 October 2013

Computer Says No

Last week the laptop died. Talk about unmitigated disaster. And the annoying thing is I have so many things to blog about. Christmas bunting, my dear friend Julie's trip to Jersey, a special gift, just to name a few things!

Thankfully my husband works in IT and should be rebuilding it as soon as a new hard drive arrives. I hope it hurries up, as where's the fun in a post without pictures? And typing on an iPad is hard work! 

Back as soon as possible, 

Sarah x